As technology marches on, gear that once required expensive lab equipment is now showing up in devices you can buy for less than a nice dinner. A case in point: those tiny displays originally sold as Nintendo amiibo emulators. Thanks to [ATC1441], one of these pocket-sized gadgets has been transformed into 2.4 GHz spectrum analyzer.
These emulators are built around the Nordic nRF52832 SoC, the same chip found in tons of low-power Bluetooth devices, and most versions come with either a small LCD or OLED screen plus a coin cell or rechargeable LiPo. Because they all share the same core silicon, [ATC1441]’s hack works across a wide range of models. Don’t expect lab-grade performance; the analyzer only covers the range the Bluetooth chip inside supports. But that’s exactly where Wi-Fi, Bluetooth, Zigbee, and a dozen other protocols fight for bandwidth, so it’s perfect for spotting crowded channels and picking the least congested one.
Flashing the custom firmware is dead simple: put the device into DFU mode, drag over the .zip file, and you’re done. All the files, instructions, and source are up on [ATC1441]’s PixlAnlyzer GitHub repo. Check out some of the other amiibo hacks we’ve featured as well.
Not only are pianos beautiful musical instruments that have stood the test of many centuries of time, they’re also incredible machines. Unfortunately, all machines wear out over time, which means it’s often not feasible to restore every old piano we might come across. But a few are worth the trouble, and [Emma] had just such a unique machine roll into her shop recently.
What makes this instrument so unique is that it’s among the first electric pianos to be created, and one of only three known of this particular model that survive to the present day. This is a Vivi-Tone Clavier piano which dates to the early 1930s. In an earlier video she discusses more details of its inner workings, but essentially it uses electromagnetic pickups like a guitar to detect vibrations in plucked metal reeds.
To begin the restoration, [Emma] removes the action and then lifts out all of the keys from the key bed. This instrument is almost a century old so it was quite dirty and needed to be cleaned. The key pins are lubricated, then the keys are adjusted so that they all return after being pressed. From there the keys are all adjusted so that they are square and even with each other. With the keys mostly in order, her attention turns to the action where all of the plucking mechanisms can be filed, and other adjustments made. The last step was perhaps the most tedious, which is “tuning” the piano by adjusting the pluckers so that all of the keys produce a similar amount or volume of sound, and then adding some solder to the reeds that were slightly out of tune.
Back in the mid 1990s, the release of Microsoft’s Windows 95 operating system cemented the Redmond software company’s dominance over most of the desktop operating system space. Apple were still in their period in the doldrums waiting for Steve Jobs to return with his NeXT, while other would-be challengers such as IBM’s OS/2 or Commodore’s Amiga were sinking into obscurity.
Into this unpromising marketplace came Be inc, with their BeBox computer and its very nice BeOS operating system. To try it out as we did at a trade show some time in the late ’90s was to step into a very polished multitasking multimedia OS, but sadly one which failed to gather sufficient traction to survive. The story ended in the early 2000s as Be were swallowed by Palm, and a dedicated band of BeOS enthusiasts set about implementing a free successor OS. This has become Haiku, and while it’s not BeOS it retains API compatibility with and certainly feels a lot like its inspiration. It’s been on my list for a Daily Drivers article for a while now, so it’s time to download the ISO and give it a go. I’m using the AMD64 version.
A Joy To Use, After A Few Snags
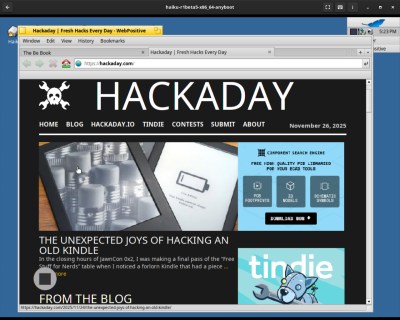
If you ignore the odd font substitution in WebPositive, it’s a competent browser.
This isn’t the first time I’ve given Haiku a go in an attempt to write about it for this series, and I have found it consistently isn’t happy with my array of crusty old test laptops. So this time I pulled out something newer, my spare Lenovo Thinkpad X280. I was pleased to see that the Haiku installation USB volume booted and ran fine on this machine, and I was soon at the end of the install and ready to start my Haiku journey.
Here I hit my first snag, because sadly the OS hadn’t quite managed to set up its UEFI booting correctly. I thus found myself unexpectedly in a GRUB prompt, as the open source bootloader was left in place from a previous Linux install. Fixing this wasn’t too onerous as I was able to copy the relevant Haiku file to my UEFI partition, but it was a little unexpected. On with the show then, and in to Haiku.
In use, this operating system is a joy. Its desktop look and feel is polished, in a late-90s sense. There was nothing jarring or unintuitive, and though I had never used Haiku before I was never left searching for what I needed. It feels stable too, I was expecting the occasional crash or freeze, but none came. When I had to use the terminal to move the UEFI file it felt familiar to me as a Linux user, and all my settings were easy to get right.
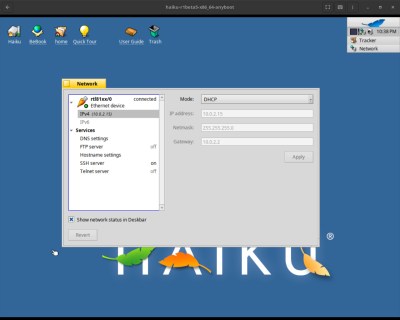
Never Mind My Network Card
If only the network setup on my Thinkpad was as nice as the one in the VM.
I hit a problem when it came to network setup though, I found its wireless networking to be intermittent. I could connect to my network, but while DHCP would give it an IP address it failed to pick up the gateway and thus wasn’t a useful external connection. I could fix this by going to a fixed IP address and entering the gateway and DNS myself, and that gave me a connection, but not a reliable one. I would have it for a minute or two, and then it would be gone. Enough time for a quick software update and to load Hackaday on its WebPositive web browser, but not enough time to do any work. We’re tantalisingly close to a useful OS here, and I don’t want this review to end on that note.
The point of this series has been to try each OS in as real a situation as possible, to do my everyday Hackaday work of writing articles and manipulating graphics. I have used real hardware to achieve this, a motley array of older PCs and laptops. As I’ve described in previous paragraphs I’ve reached the limits of what I can do on real hardware due to the network issue, but I still want to give this one a fair evaluation. I have thus here for the first time used a test subject in a VM rather than on real hardware. What follows then is courtesy of Gnome Boxes on my everyday Linux powerhouse, so please excuse the obvious VM screenshots.
This One Is A True Daily Driver
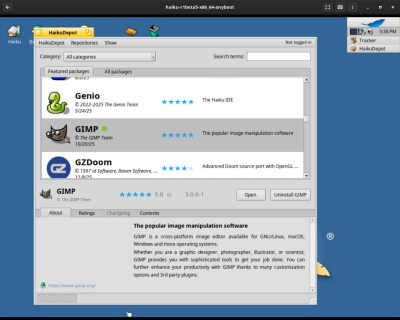
There’s plenty of well-ported software, but nothing too esoteric.
With a Haiku install having a working network connection, it becomes an easy task to install software updates, and install new software. The library has fairly up-to-date versions of many popular packages, so I was easily able to install GIMP and LibreOffice. WebPositive is WebKit-based and up-to-date enough that the normally-picky Hackaday back-end doesn’t complain at me, so it more than fulfils my Daily Drivers requirement for an everyday OS I can do my work on. In fact, the ’90s look-and-feel and the Wi-Fi issues notwithstanding, this OS feels stable and solid in a way that many of the other minority OSes I’ve tried do not. I could use this day-to-day, and the Haiku Thinkpad could accompany me on the road.
There is a snag though, and it’s not the fault of the Haiku folks but probably a function of the size of their community; this is a really great OS, but sadly there are software packages it simply doesn’t have available for it. They’ve concentrated on multimedia, the web, games, and productivity in their choice of software to port, and some of the more esoteric or engineering-specific stuff I use is unsurprisingly not there. I can not fault them for this given the obvious work that’s gone into this OS, but it’s something to consider if your needs are complex.
Haiku then, it’s a very nice desktop operating system that’s polished, stable, and a joy to use. Excuse it a few setup issues and take care to ensure your Wi-Fi card is on its nice list, and you can use it day-to-day. It will always have something of the late ’90s about it, but think of that as not a curse but the operating system some of us wished we could have back in the real late ’90s. I’ll be finding a machine to hang onto a Haiku install, this one bears further experimentation.
Looking for an educational microcontroller board to get you or a loved one into electronics? Consider the tinyCore – a small and nifty hexagon-shaped ESP32 board by [MR. INDUSTRIES], simplified for learning yet featureful enough to offer plenty of growth, and fully open.
The tinyCore board’s hexagonal shape makes it more flexible for building wearables than the vaguely rectangular boards we’re used to, and it’s got a good few onboard gadgets. Apart from already expected WiFi, BLE, and GPIOs, you get battery management, a 6DoF IMU (LSM6DSOX) in the center of the board, a micro SD card slot for all your data needs, and two QWIIC connectors. As such, you could easily turn it into, say, a smartwatch, a motion-sensitive tracker, or a controller for a small robot – there’s even a few sample projects for you to try.
You can buy one, or assemble a few yourself thanks to the open-source-ness – and, to us, the biggest factor is the [MR.INDUSTRIES] community, with documentation, examples, and people learning with this board and sharing what they make. Want a device with a big display that similarly wields a library of examples and a community? Perhaps check out the Cheap Yellow Display hacks!
After you have written the code for some awesome application, you of course want other people to be able to use it. Although simply directing them to the source code on GitHub or similar is an option, not every project lends itself to the traditional configure && make && make install, with often dependencies being the sticking point.
Asking the user to install dependencies and set up any filesystem links is an option, but having an installer of some type tackle all this is of course significantly easier. Typically this would contain the precompiled binaries, along with any other required files which the installer can then copy to their final location before tackling any remaining tasks, like updating configuration files, tweaking a registry, setting up filesystem links and so on.
As simple as this sounds, it comes with a lot of gotchas, with Linux distributions in particular being a tough nut. Whereas on MacOS, Windows, Haiku and many other OSes you can provide a single installer file for the respective platform, for Linux things get interesting.
It’s happened to all of us: you find the perfect model for your needs — a bracket, a box, a cable clip, but it only comes in STL, and doesn’t quite fit. That problem will never happen if you’re using Iteration3D to get your models, because every single thing on the site is fully-parametric, thanks to an open-source toolchain leveraging 123Dbuilds and Blender.
Blender gives you preview renderings, including colors where the models are set up for multi-material printing. Build123D is the CAD behind the curtain — if you haven’t heard of it, think OpenSCAD but in Python, but with chamfers and fillets. It actually leverages the same OpenCascade that’s behind everyone’s other favorite open-source CAD suite, FreeCAD. Anything you can do in FreeCAD, you can do in Build123D, but with code. Except you don’t need to learn the code if the model is on Iteration3D; you just set the parameters and push a button to get an STL of your exact specifications.
The downside is that, as of now, you are limited to the hard-coded templates provided by Iteration3D. You can modify their parameters to get the configuration and dimensions you need, but not the pythonic Build123D script that generates them. Nor can you currently upload your own models to be shared and parametrically altered, like Thingiverse had with their OpenSCAD-based customizer. That said, we were told that user-uploads are in the pipeline, which is great news and may well turn Iteration3D into our new favorite.
Right now, if you’re looking for a box or a pipe hanger or a bracket, plugging your numbers into Iteration3D’s model generator is going to be a lot faster than rolling your own, weather that rolling be done in OpenSCAD, FreeCAD, or one of those bits of software people insist on paying for. There’s a good variety of templates — 18 so far — so it’s worth checking out. Iteration3D is still new, having started in early 2025, so we will watch their career with great interest.
Going back to the problem in the introduction, if Iteration3D doesn’t have what you need and you still have an STL you need to change the dimensions of, we can help you with that.
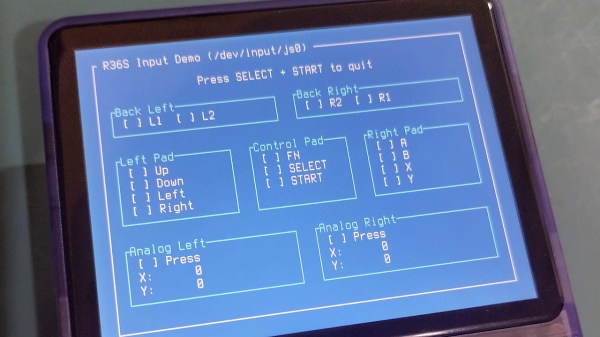
The age of cheap and powerful devices is upon us. How about a 20 EUR handheld game console intended for retro game emulation, that runs Linux under the hood? [Luiz Ferreira] kicks the tires of a R36S, a very popular and often cloned device running a quad-core RK3326 with an Ubuntu-based OS, and shows us how to write and cross-compile a simple app for it using Rust – even if you daily drive Windows.
Since a fair bit of the underlying Linux OS is exposed, you can quickly build even text applications and have them run on the console. For instance, [Luiz]’s app uses ratatui to scan then print button and joystick states to the screen. Perhaps the most important thing about this app is that it’s a detailed tutorial on cross-compiling Rust apps for a Linux target, and it runs wonders using WSL, too.
Installing your app is simple, too: SSH into it, username ark and password ark. Looking for a Linux-powered device with a bright screen, WiFi, a fair few rugged buttons, and an OS open for exploration? This one is quite reassuring in the age of usual portables like smartphones getting more and more closed-off to tinkering. And, if the store-bought hackable Linux consoles still aren’t enough, you can always step it up and build your own, reusing Joycons for your input needs while at it.